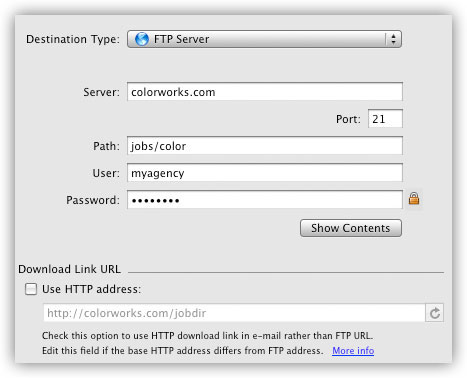
Downloads
Store
Support
 
a

Deliver / Deliver Express User Guide

DESTINATIONS

+

Use the buttons above to create, duplicate and delete destinations.

Destination names can be edited directly in the table by double-clicking the entries, as well as in the Name field.

Deliver Express also allows to create Destination Groups, which let you send files to multiple destinations at once.


b Tip: Use tool tips for detailed description of each control. Just hover the mouse over a setting to see a tool tip with more information.

b Destination files: Deliver's destination files (.dest) are plain XML property list (.plist) files. They can be imported to and created by popular database and spreadsheet programs. Destinations are stored in the following folders - for Deliver and Deliver Express respectively:
~/Library/Application Support/Zevrix/Deliver/Destinations
~/Library/Application Support/Zevrix/Deliver Express/Destinations

Mac App Store version:
~/Library/Containers/com.zevrix.Deliver/Data/Library/Application Support/Zevrix/Deliver/Destinations

Deliver and Deliver Express can use the same destination files - just copy them between the folders if required.


Location

location

    Destination Type: Choose the desired type of destination.

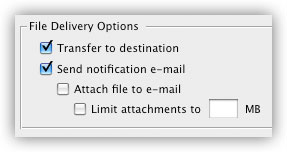
Note: If you wish to send files by e-mail only, just choose FTP, omit all the server related details and uncheck "Transfer to destination" option.

    Server (Host): Specify the server address without protocol prefix such as ftp://, http:// etc.

    Path: Path to target directory on the server (if any), Amazon S3 bucket name or a local path, depending on destination type.

Note: On MobileMe accounts, enter Public if you send files to that folder.

    User: Login user name (if required).

    Password: Login password (if required).

    Reveal/Hide password: Click the lock next to the password field to reveal the current password in clear text (you'll be ask for admin password). Hold the Option key when you click the lock to keep passwords revealed as you switch between destinations.

    Show Contents: Connect to the destination and show file list. Deliver lets you delete files, create folders and refresh contents. You can only see the contents of the current location.

    Download Link URL (FTP only): This option defines how the download link to your file will appear in notification e-mail. It can appear as a standard web address (http://...) or as FTP URL which includes the user name and password. For detailed info, open Deliver and click the "More info" link (see screenshot above).

Note: By default, Deliver always uses passive mode for FTP transfer. It will switch to active mode automatically if required by a particular FTP site.

E-mail

Deliver can send a notification e-mail upon each delivery.

In order to send e-mail, you must set up at least one e-mail template.

Select the desired template in the pop-up menu.

Add the To, Cc and Bcc recipients for the current destination. In addition to these recipients, the e-mail will be also sent to the "global" recipients specified in the selected template (if any).

You can add e-mail directly from Address Book by clicking the button with its icon.

Note: You can add temporary extra recipients on the fly as you send files in the Dispatcher window.

Compression

Choose between Zip and disk image (.dmg) compression. Deliver allows to protect disk images with a password.

Note: Folders will be always compressed when transferred to WebDAV, Amazon S3 and Google Storage.

Advanced

If you send a single PDF file:

Deliver can automatically create a low resolution version of the PDF file and attach it to e-mail. All images will be downsampled to 72 pixel/inch and compressed with a Medium JPEG compression, and all elements will be converted to RGB. It will ensure the smallest possible PDF file size for faster e-mail transfer.

The "_lo-res" string will be appended to the file name:

    original_name_lo-res.pdf

Note: This option will be ignored if you choose to attach the original file to e-mail message in the File Delivery Options.

If you send a folder:s

Deliver can automatically attach files from a subfolder to the e-mail notification.

Specify the desired subfolder name. All files from the subfolder will be attached to the notification e-mail.

Note: Files from any subfolders inside of this subfolder will not be attached.

File Delivery Options

    Transfer to destination: Check if you wish to upload files/folders to destination server. Uncheck if you want to send files by e-mail only (see below).

    Send e-mail notifications: Check if you wish to send delivery notifications (make sure that proper outgoing mail info is set in e-mail templates).

do

    Attach to e-mail: Check if you wish to attach the file to notification e-mail.

Note: If you check this option and uncheck "Transfer to destination", the destination icon will change to e-mail to denote e-mail delivery only.

    Limit attachments to: Enter the maximum allowed attachment size.

Hot Folder [Deliver Express only]

location

Create destination hot folder to process files automatically with Deliver Express. Deliver Express scans hot folders every 5 seconds and sends files automatically to their respective destinations.

    Choose Location: Choose the desired parent folder for your hot folder. The hot folder itself will be created inside the parent folder and named after the destination automatically.

Once the hot folder is created, its interactive path will appear above the buttons. Click path components to open them in Finder.

    Remove: Delete the current hot folder. The destination will not be watched.

    File > Create All Hotfolders (menu): You can also create hot folders for all destinations at once using the Create All Hotfolders menu. You'll be prompted to select a folder where the hot folders will be created.


Note: You can also send files using a single hot folder for all destinations by enabling code-based delivery.


Hot Folder Structure

To send a regular file or folder, just drop it into the hot folder. Deliver Express will automatically send files or add them to the queue.

The following folders are created automatically inside a hot folder:

Priority: Use this folder for rush deliveries. Files in the Priority folder will be processed prior to other files in the existing queue.

Done: Successful deliveries will be moved there after processing unless a different option is checked in Preferences.

Errors: Deliveries with errors will be moved there after processing unless a different option is checked in Preferences.

Options

Overwrite existing files/folders

If the file name you send already exists in the target location, it will be overwritten. Otherwise, a number will be appended to the file name.

Date Subfolderss

Deliver will automatically create date subfolders as described in the app window.

File Expirys

Deliver will automatically delete files/folders from the destination after the specified number of days.

Deliver checks for expired files every hour. The app must be running for this feature to work.

If the item cannot be deleted for some reason (connection issues, permissions etc.), Deliver will keep attempting to delete it for the next 3 days. If all attempts fail, the app will add an error to the Errors window and stop trying to remove the file.

Note: If you make a change to the file expiry settings, it will not be applied to files that have already been sent. They will be treated according to the settings that were active when the files were sent. If you wish to prevent Deliver from expiring previously sent items, you can delete this file:

~/Library/Application Support/Zevrix/Deliver Express/FileExpiry.zsdtb

   
© 2006-2024 Zevrix Solutions. All rights reserved.
About Products Buy Contact